06.10.2026 • 5m min. čitanja
How to Replace a Motorcycle Battery

Replacing an old motorcycle battery is a job many riders are happy to handle themselves rather than relying on a professional mechanic. Learning how to replace your motorcycle battery can save both time and money, but it’s important to know what you’re doing. You not only want to make sure your bike stays protected, but also need to ensure the job is done safely. Compatibility also matters when it comes to motorcycle batteries. If you need help choosing a suitable replacement, take a look at the XLMOTO article on choosing the right motorcycle battery. Once you’ve selected the right battery, read on to learn how to replace your motorcycle battery correctly.
Signs Your Motorcycle Battery Needs Replacing
Our ultimate guide to motorcycle batteries covers many of the issues linked to ageing or failing batteries in more detail. In most cases, there are a few clear warning signs that suggest your current motorcycle battery is nearing the end of its service life. Recognising these early can help you avoid unexpected breakdowns or starting problems.
Slow engine cranking
If the starter motor sounds weaker than usual or turns the engine over more slowly, this often points to a battery that is losing capacity. Cold mornings can make the problem more noticeable, as weak batteries struggle most at low temperatures. If recharging the battery does not restore normal cranking speed, replacing your motorcycle battery is usually the safest option.
Electrical issues
Dim headlights, flickering indicators, or dashboard lights that appear weaker than normal can all signal that the motorcycle battery is no longer delivering stable power. These symptoms often show up during idling or low-speed riding, when the charging system has less chance to replenish the battery. If the issue remains after a longer ride, the battery is likely no longer holding a charge effectively, which means it's time to replace your motorcycle battery.
Physical damage or corrosion
Visible swelling or deformation of the battery casing indicates internal damage and often points to overcharging or age-related failure. Corrosion around the terminals, strong smells, or a white powdery residue are further warning signs that the motorcycle battery is compromised. In these cases, battery replacement should not be delayed for safety reasons.

Tools and Equipment You’ll Need
Learning how to replace your motorcycle battery at home is relatively simple, and most riders already own the basic tools. Unlike many motorbike maintenance jobs, you won't need to fork out cash for expensive or specialist tools.
Basic tools
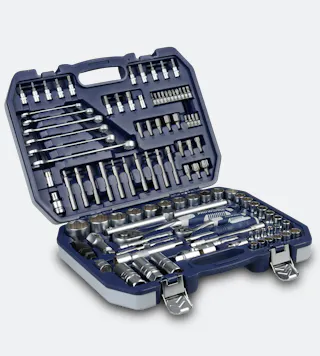
If you need to remove your bike's seat, side panels or covers to get to the battery tray, then a screwdriver is often all you'll require. A spanner or a suitably sized socket set will be enough to manage the battery's terminal bolts. Other than that, a clean cloth should be available to wipe over the terminals to remove any residue on them.
Safety gear
Safety glasses or goggles are recommended when handling old motorcycle batteries, as they can contain corrosive residues. Wearing protective gloves also helps prevent skin contact with terminal build-up or leaks. Sturdy, closed-toe footwear is sensible when lifting a battery, as they can be heavier than expected and awkward to handle.
Optional helpful items
A wire brush may be useful if you need to remove more than a light build-up of terminal residue. A multimeter can also be handy, so you can check the charge of the new battery after it has been installed. Finally, if you want to protect the new battery's terminals from future corrosion, having some dielectric grease to hand may be a wise move.



How to Prepare Your Bike Before Replacing the Battery
Before removing your old or worn motorcycle battery, it is advisable to prepare the bike properly. This will help you to avoid potential electrical faults or accidental damage. Taking a few minutes to set things up safely simply makes the job easier and, in many cases, safer.
Turn off the ignition
Turn your bike off and remove the key to ensure it cannot be switched on accidentally while you work. If you just took your bike for a ride, make sure you allow the engine to cool fully before taking any further steps. All electrical systems, including the bike’s lights and any third-party accessories such as USB chargers or navigation systems, should be powered down.
Locate the battery
The owner’s manual is the best place to check the exact location of the motorcycle battery on your bike. Many manufacturers place the battery under the seat, behind the side panels or near the fuel tank, but layouts vary between models. The manual will also explain what needs to be removed to access it and the correct order to do so, helping you avoid unnecessary dismantling or damage.
Accessing the battery compartment
When opening the battery tray or compartment, set aside any parts you remove in an organised way so they can be refitted correctly later. This includes bolts, screws and clips, which should go back into their original positions. Before touching the motorcycle battery, identify the negative terminal, which should be disconnected first, followed by the positive terminal.

Step-by-Step: How to Remove the Old Battery
Removing your old motorcycle battery needs to be done safely and in the correct order. It is not simply a question of pulling the current one out to make space for its replacement. Even a seemingly old and dead motorcycle battery may have sufficient power to cause a shock or a short circuit, so treat it with care when handling it.
Disconnecting the negative terminal
Always begin by removing the cable from the battery’s negative terminal. This terminal is marked with a (–) symbol and is usually connected to a black cable. Always check the symbol before disconnecting either terminal, as cable colours are not guaranteed and incorrect wiring is possible, even if uncommon. Use a spanner or socket to loosen the terminal bolt until the cable comes free. Once disconnected, move the cable clear of the battery, as you want to make sure it cannot spring back into contact with the terminal.
Disconnecting the positive terminal
Once the negative cable is safely out of the way of the battery, it is time to disconnect the positive terminal. This will be designated with a (+) symbol and typically has a red cable connected to it. Removing it follows much the same procedure as disconnecting the negative terminal. Take care not to allow tools to touch any metal parts of the bike while disconnecting either terminal, and keep the positive cable well out of the way, just as you did with its negative counterpart earlier.
Removing the battery safely
Many motorcycle designs use retaining straps, brackets, or clips to keep the battery securely fixed inside its housing. These need to be released carefully before it is possible to lift the old motorcycle battery out. Because many batteries contain liquid, it is important to keep the battery upright while handling it. Take your time during removal and wear gloves to protect your hands from any potential leaks or spills. Once the motorcycle battery has been removed, place it on a flat, stable surface that is out of reach of pets or children. You can then arrange for the battery to be disposed of responsibly at a later stage.

Step-by-Step: How to Install the New Battery
Make sure you have a compatible motorcycle battery ready to fit. A like-for-like replacement may be all you need, but replacing a battery can also be a good opportunity to consider an upgrade. The XLMoto guide Types of Motorcycle Batteries explains the different battery technologies available today. Not all motorcycle models support every battery type, however, so always check your owner’s manual to confirm what your bike can safely use.
Positioning the new battery
Keeping the new motorcycle battery in the same orientation as the old one, carefully lift it into the battery tray or housing. The battery's terminals should be in the same position as before. Check that the new battery sits flat without wobbling around and adjust it if necessary. Sometimes straps or clips can get in the way, and you might need to move them in such cases.
Connecting the positive terminal
When fitting a new motorcycle battery, reconnect the terminals in the reverse order of how they were removed. Start with the red, positive cable and attach it to the positive (+) terminal. Tighten the terminal bolt using a spanner or socket, taking care not to overtighten it. The connection should be secure, with no movement in the cable once fitted.
Connecting the negative terminal
The next step is to connect the black, negative cable to the negative (-) terminal. Make sure the cable routing avoids sharp edges or moving parts, and tighten the terminal in just the same way you did for the other terminal.
Securing the battery in place
With both terminals connected, secure the battery in its housing. This may involve refitting a retaining strap or pressing clips back into place to keep the battery sitting firmly without moving. On some bikes, double-sided foam tape or adhesive pads are used to take up excess space, but these should only support the main fixing method, not replace it. Check the owner’s manual for any model-specific instructions, as fixing methods can vary. Make sure the newly fitted motorcycle battery will not move under vibration or shift during acceleration. If required, refit any covers or panels you removed earlier.
Testing the New Battery
With your new motorcycle battery fitted, it is time to confirm it is working correctly. Here are the steps to follow to ensure the installation has gone according to plan.
Starting the motorcycle
Turn the ignition on and start your bike's engine as you normally would. What you want to detect is a strong start with cranking that doesn't feature any hesitancy or the need to try more than once. After establishing that, idle the engine briefly to confirm that it runs stably.
Checking electrical components
Next, take a moment to check that the bike’s electrical system is working as it should. Turn on the lights, indicators and any fitted accessories, and watch for flickering or unexpected dimming. Keep an eye on the dashboard for warning lamps that might point to an electrical issue, and confirm that the horn and any other electrically powered accessories are operating normally.
Verifying proper charge
Use a multimeter to check that the battery voltage sits within the correct operating range. If it is low, the battery may need charging. Check out our article on how to charge your motorcycle battery if you need to top it up. In some cases, a normal ride is enough to confirm the battery is charging as it should. After riding, check the voltage again to make sure the battery is receiving charge correctly.
Common Mistakes to Avoid
Even if you already know how to replace your motorcycle battery, it’s easy to overlook small details, especially if you don’t do the job often. For riders who are learning how to replace a battery for the first time, these points are even more important. Keeping them in mind helps protect both the bike and the person working on it.
Connecting terminals in the wrong order
If the battery terminals are connected in the wrong order, sparks can occur. This usually happens when a tool comes into contact with the bike’s frame or another metal component while a terminal is still live. To avoid this risk, always disconnect the negative (–) terminal first, followed by the positive (+) terminal.
When installing the new battery, the process should be reversed, meaning the positive (+) terminal is connected first and the negative (–) terminal last. Sticking to this order helps reduce the risk of short circuits and is an important safety habit whenever you carry out work on a motorcycle battery.
Using the wrong battery type
Installing a battery with incorrect voltage can cause charging issues. Even if the battery works, you may find it doesn't replenish as it should, meaning you'll face issues down the line. The wrong size of battery may also cause problems. Too large and it won't fit, while an undersized motorcycle battery may be harder to secure in the tray or housing. Always check the compatibility of your new battery with the specifications laid out in your owner's manual.
Ignoring corrosion or damaged cables
Corroded terminals can restrict current flow. If you want the engine to turn over reliably, clean the battery’s terminals before reconnecting the cables. Frayed or cracked cables can also lead to overheating or intermittent electrical faults. If you spot this kind of damage, it’s best to deal with it before fitting a new battery. Ignoring these issues can affect the performance of your newly fitted battery and reduce its overall lifespan.


